Loading Data
Overview
Snowflake loads data using a two-step process:
- Files are first uploaded into a staging area
- Data is loaded into target tables.
This workflow separates storage from ingestion logic, which keeps the pipelines organized and reliable for both manual uploads and automated workflows.
Snowflake supports common file formats used in data pipelines:
- CSV
- JSON
- Parquet
- Avro
Options for Loading Data
1. Quick Uploads using Snowsight
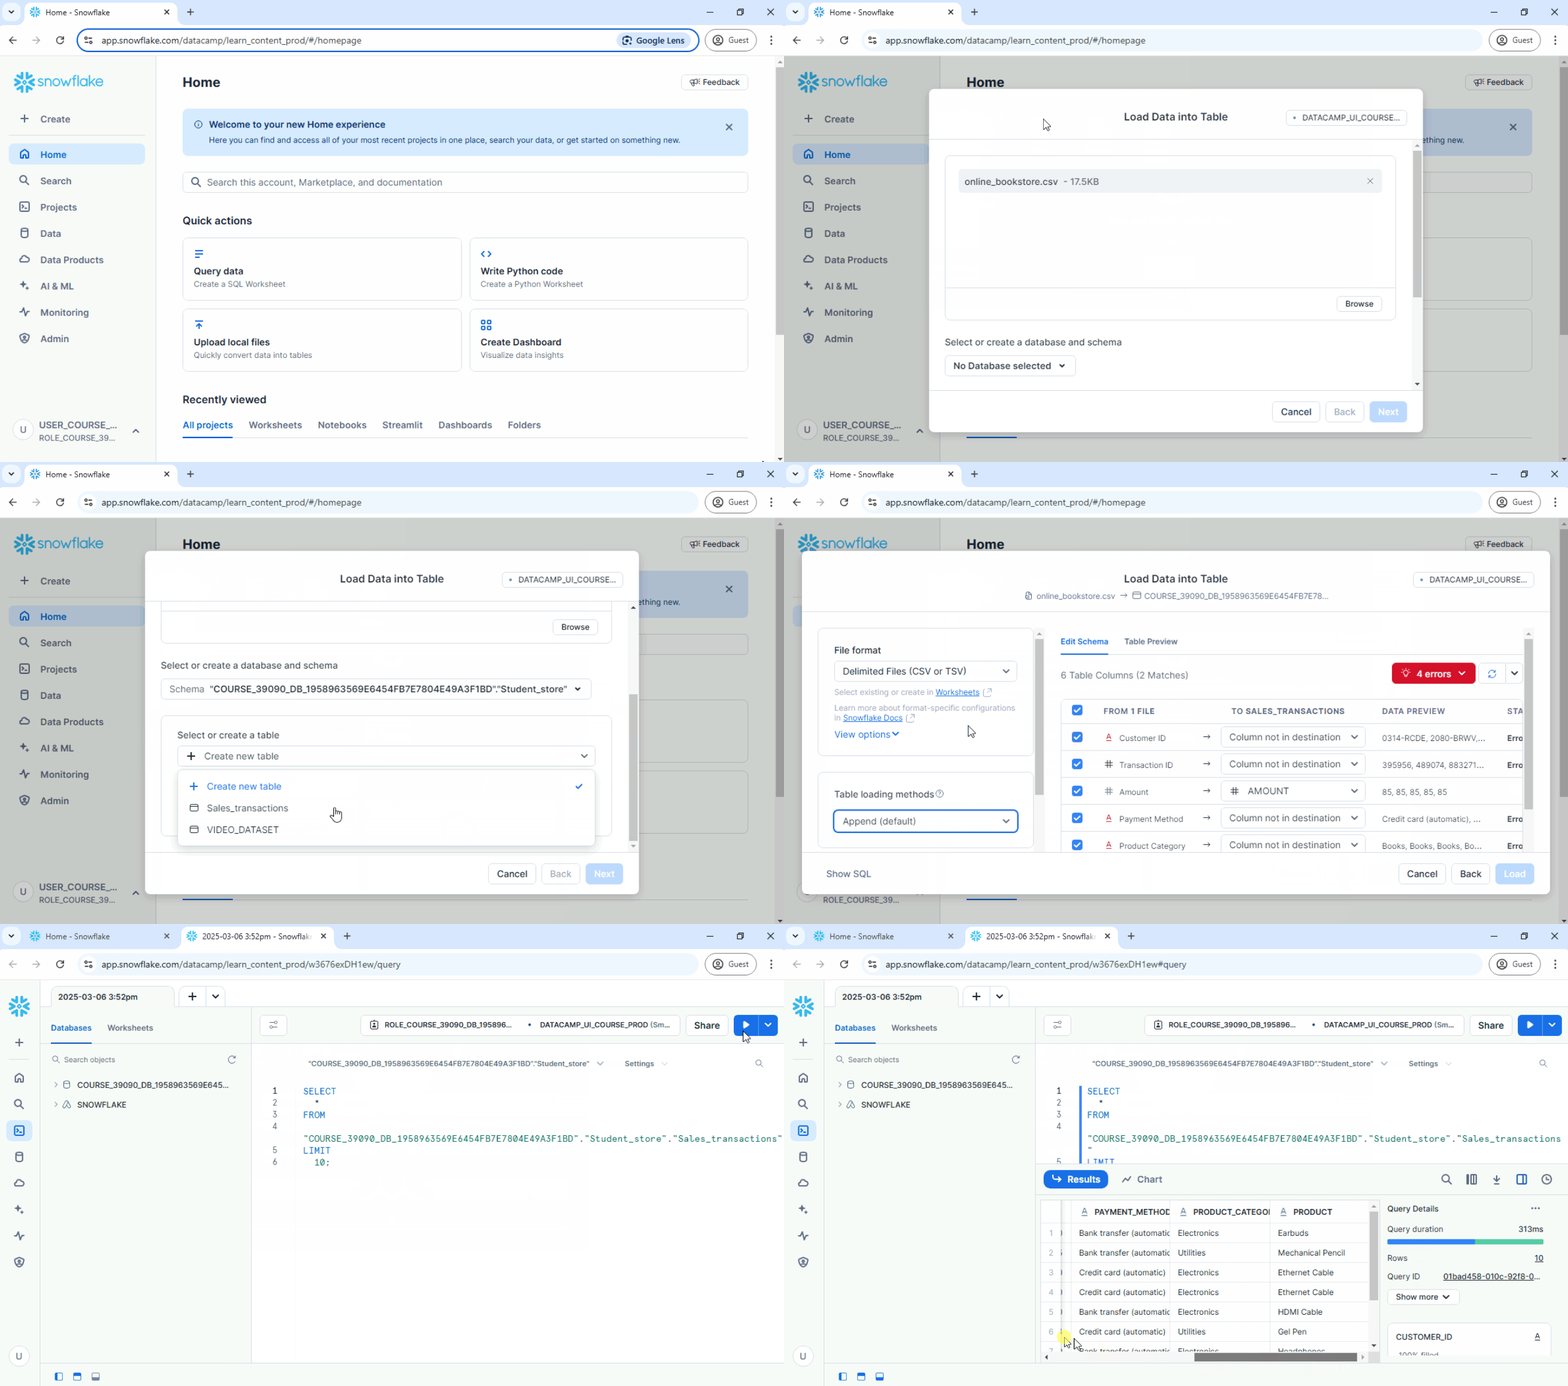
A simple way to start is by uploading local CSV files directly through the Snowsight user interface.
The UI wizard supports:
- Different delimiters like commas and tabs
- Error logs for failed rows
- Automated uploads using SQL commands
This method is ideal for quick testing, demos, or small manual tasks.
Steps:
- Prepare the local CSV file.
- Create the destination table in Snowflake.
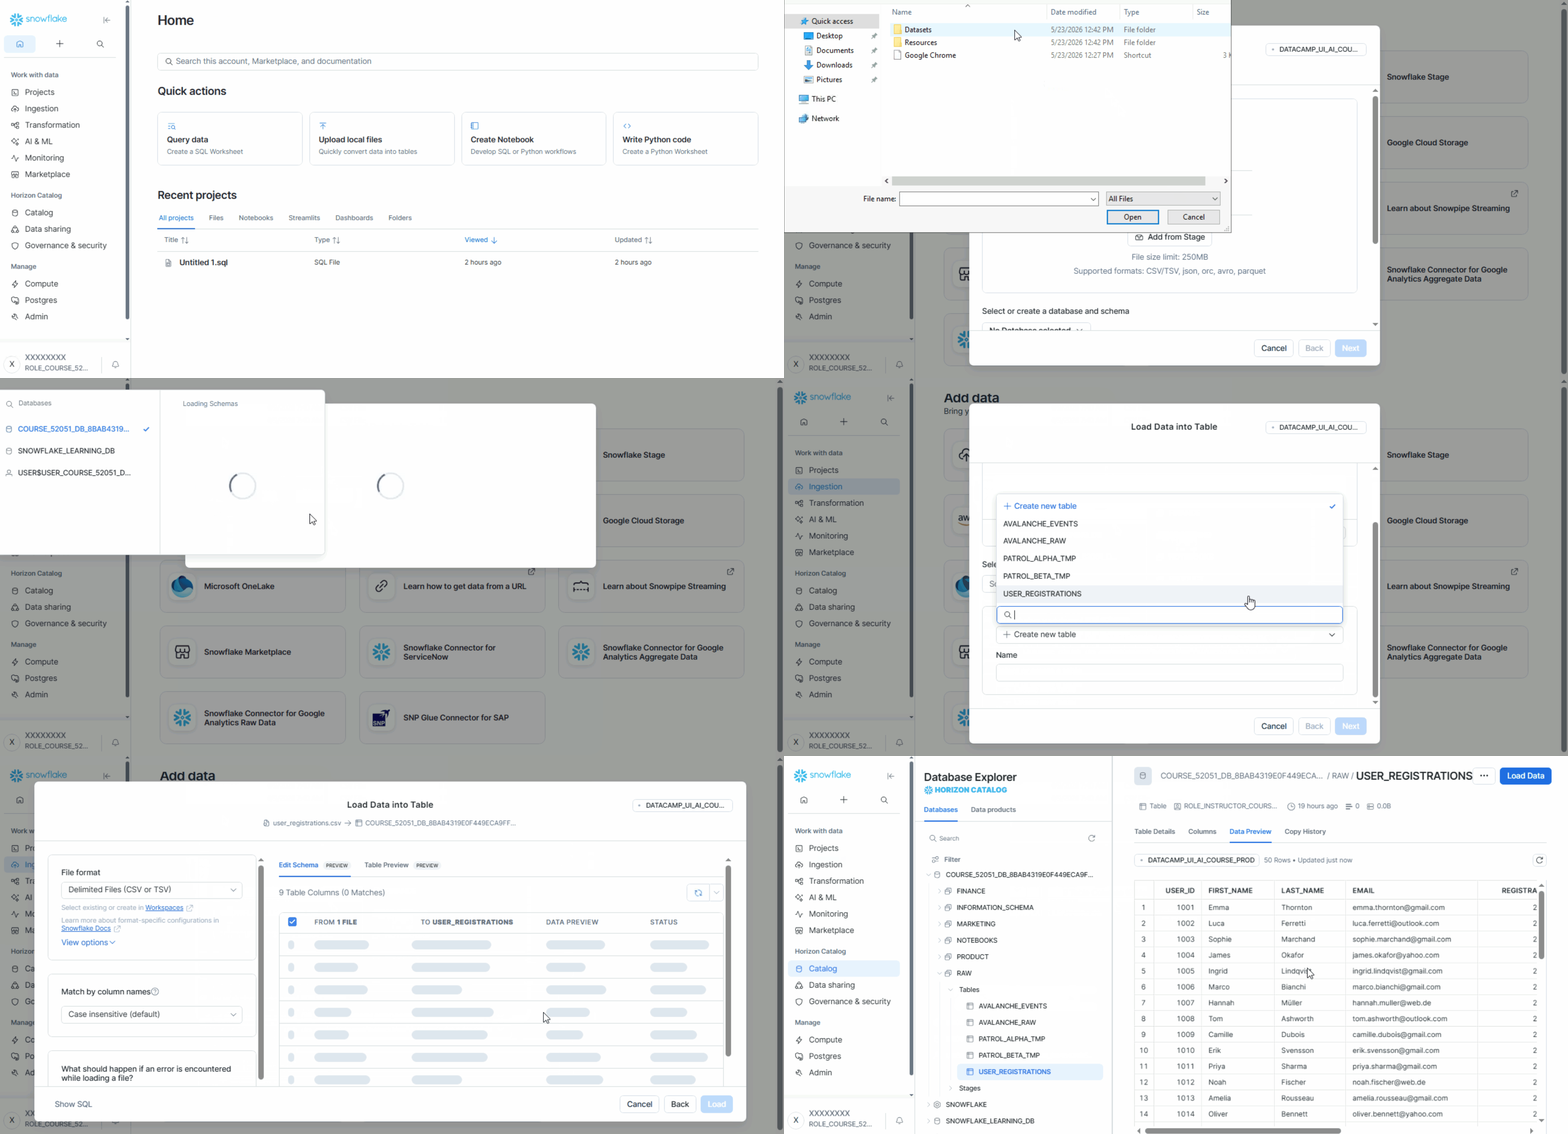
- In Snowsight, go to Data ➜ Load Data.
- Select the CSV file.
- Choose the database, schema, and table.
- Complete the upload process.
- Verify the imported data.
See below:
UPDATE: There are some updates to the Snowsight UI, but the overall process remains the same. The options for loading data can now be found in the Ingestion tab.
2. Staging-Based Loading Workflow
Snowflake does not load files directly from your computer into tables. Instead, files must live in a stage, which acts as a temporary storage location before ingestion.
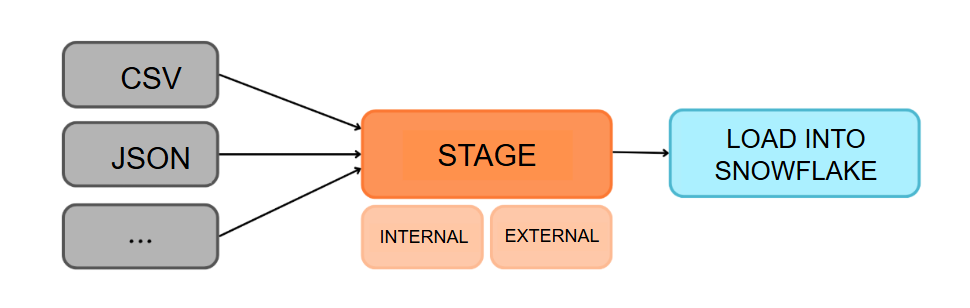
Stages come in two types:
| Type | Description |
|---|---|
| Internal Stages | Storage spaces fully managed by Snowflake |
| External Stages | Secure connections to cloud storage such as Amazon S3, Google Cloud Storage, or Azure Blob Storage |
To create a basic internal stage using SQL:
CREATE STAGE raw_stage;
To create an external stage using SQL:
CREATE STAGE my_external_stage
URL = 's3://my-bucket/data/'
STORAGE_INTEGRATION = my_s3_integration;
For more information, please see Loading Data from a Cloud Provider section below.
Directory Tables
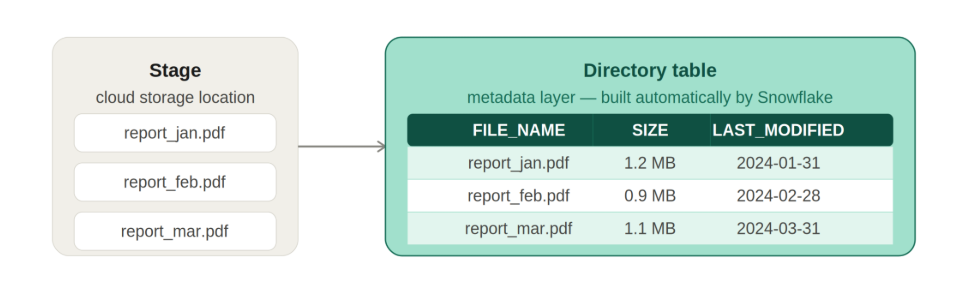
Stages can optionally expose metadata about files using directory tables.
- Tracks files inside a stage automatically
- Stores file name, size, timestamp, and path
- Acts as a metadata layer over staged files
Directory tables are automatically generated by Snowflake when enabled and can be queried like regular tables to inspect staged files before loading them into Snowflake tables.
To enable directory tracking:
CREATE STAGE my_stage
  DIRECTORY = (ENABLE = TRUE);
Refresh metadata:
ALTER STAGE my_stage REFRESH;
Once enabled, directory tables can be queried like metadata views. You can list files in a stage, check their sizes, and see when they were last modified.
SELECT *
FROM DIRECTORY(@my_stage);
This returns a list of files in the stage along with their metadata, which is crucial for validating what data is available before loading it into Snowflake tables.
Pre-signed URLs for External Access
Snowflake can generate temporary URLs for files stored in a stage. These are used when external systems need access without Snowflake login.
| Type | Description |
|---|---|
| Stage URLs | Direct stage reference paths |
| Scoped File URLs | Limited access to a specific file in a session |
| Pre-signed URLs | Time-limited HTTPS links for external access |
| Related Helpers | Functions like GET_PRESIGNED_URL for URL generation |
To generate a pre-signed URL:
SELECT GET_PRESIGNED_URL(@my_stage, 'file.csv', 3600);
This returns a time-limited HTTPS link that expires after the defined duration.
Loading Data from a Cloud Provider
For larger datasets or automated ingestion, Snowflake loads data directly from cloud storage using external stages and secure integrations.
- Store files in cloud storage.
- Create a storage integration.
- Create an external stage.
- Refresh or inspect the stage.
- Load data into a table.
- Verify imported records.
This process allows Snowflake to securely access external files without manually uploading them.
Setting Up the Stage
Snowflake uses storage integrations to securely connect to cloud providers.
- Grant storage access permissions
- Use storage integrations securely
- Create stages pointing to cloud folders
In the example below, Snowflake connects to an S3 bucket using an IAM role.
CREATE STORAGE INTEGRATION my_s3_integration
  TYPE = EXTERNAL_STAGE
  STORAGE_PROVIDER = 'S3'
  STORAGE_AWS_ROLE_ARN = 'arn:aws:iam::123456789012:role/my-s3-role';

CREATE STAGE my_stage
  STORAGE_INTEGRATION = my_s3_integration
  URL = 's3://my-bucket/data/';
Inspecting Stage Files
Before loading data, verify that the uploaded files exist inside the stage.
In the example below, the LIST command checks files stored inside my_stage.
LIST @my_stage;
The @ symbol indicates that the object is a stage, not a table. The output will show file names, sizes, and timestamps.
Loading Data with COPY INTO
Once files are validated, use the COPY INTO command to bulk load the staged data into the target table.
First, create the target table:
CREATE TABLE customer_signups (
  id INT,
  name STRING,
  signup_date DATE
);
Then load data from the stage:
COPY INTO customer_signups
  FROM @my_stage
  FILE_FORMAT = (TYPE = 'CSV');
Note that most loading issues stem from mismatched file format configurations, such as incorrect delimiters or unexpected header rows.
In the example below, the FILE_FORMAT option specifies that the files are CSV. If the CSV files have a header row, you would also need to specify SKIP_HEADER = 1 in the file format definition to avoid loading the header as data.
CREATE OR REPLACE FILE FORMAT my_csv_format
  TYPE = 'CSV'
  FIELD_DELIMITER = ','
  SKIP_HEADER = 1;

COPY INTO orders
FROM @my_stage/orders/june2024.csv
FILE_FORMAT = (FORMAT_NAME = 'my_csv_format');
Loading Semi-Structured Data
Snowflake also supports semi-structured formats using the VARIANT data type.
- Stores JSON without fixed schema
- Supports nested objects and arrays
- Allows dynamic querying
In the example below, a table is created with a VARIANT column and JSON data is loaded from a stage.
CREATE TABLE raw_json_table (
  data VARIANT
);

COPY INTO raw_json_table
FROM @my_stage/events.json
FILE_FORMAT = (TYPE = JSON);
Querying JSON Data
JSON fields stored in VARIANT columns use special query syntax.
- Colon (
:) accesses JSON fields - Double colon (
::) converts data types
In the example below, Snowflake extracts fields from JSON data:
SELECT
  data:user_name::STRING AS user_name
  data:signup_date::DATE AS signup_date
FROM raw_json_table;
This syntax makes it possible to query nested JSON data directly in SQL.
Verifying the Data
After loading, run a quick query to confirm that the data is ingested successfully and that the table structure looks as expected.
Here, the query checks the first five rows of the table customer_signups.
SELECT *
FROM customer_signups
LIMIT 5;
This final step ensures that the full loading process from stage to table completed successfully and data is ready for use.