Networking and Security
Overview
The following steps are the applicable on all three nodes.
To login to each node:
-
Controller node:
ssh -i ~/.ssh/vbox jmeden@10.0.0.11 -
Compute node:
ssh -i ~/.ssh/vbox jmeden@10.0.0.21 -
Storage node:
ssh -i ~/.ssh/vbox jmeden@10.0.0.31
Grant Passwordless Sudo to User
Edit the sudoers file:
sudo visudo
Add your username at the end:
jmeden ALL=(ALL) NOPASSWD:ALL
This will your user to run any command with sudo without a password prompt. You can test this by running:
sudo su
Hosts File Configuration (Basic Name Resolution)
Edit /etc/hosts on all nodes to include the other nodes:
sudo vi /etc/hosts
Example:
127.0.0.1 localhost
# 127.0.1.1 ---> If this present, remove or comment out
10.0.0.11 controller
10.0.0.21 compute1
10.0.0.31 block1
This allows simple hostname-based pinging between nodes.
Optional: In production, use proper DNS instead.
(OUTDATED) Disable Predicatable Network Interface Names
This step is not necessary in newer Ubuntu versions. You can skip this step.
To revert to traditional interface names (e.g., eth0), edit the GRUB configuration file:
sudo vi /etc/default/grub
Then add this:
GRUB_CMDLINE_LINUX="net.ifnames=0 biosdevname=0"
This forces:
enp0s3➔eth0enp0s8➔eth1enp0s9➔eth2
This was commonly done in:
- Ubuntu 14.04 / 16.04
- Older OpenStack guides
- Legacy documentation
(OUTDATED) Configure Network Interfaces
This step is not necessary in newer Ubuntu versions. You can skip this step.
Note: enp0s* corresponds to traditional eth0, eth1, eth2.
Do not rename unless necessary; OpenStack will work with enp0s*.
Below is a sample Netplan configuration for the controller node:
network:
  version: 2
  ethernets:
    enp0s3:       # Host-only (management)
      addresses:
        - 10.0.0.11/24
      gateway4: 10.0.0.1
      nameservers:
        addresses:
          - 8.8.8.8
          - 1.1.1.1

    enp0s8:       # Provider network
      dhcp4: no
      optional: true
      addresses: []

    enp0s9:       # Internet access (NAT Network)
      dhcp4: yes
- Controller:
.11on management, provider manual, internet via DHCP - Compute:
.21on management, provider manual, internet via DHCP - Block:
.31on management, provider manual, internet via DHCP
Apply the config:
sudo netplan apply
Verify interfaces:
ip a
ping -c3 10.0.0.21
ping -c3 8.8.8.8
Verify Network Configuration
Perform the following on each node:
-
Check the interface addresses:
ip aYou should see:
Interface IP Status enp0s3 10.0.0.11 ✅ UP enp0s8 10.10.10.11 ✅ UP enp0s9 10.0.2.17 (DHCP) ✅ UP -
Check the default route:
ip routeSample output:
default via 10.0.2.1 dev enp0s9 proto dhcp src 10.0.2.17 metric 10010.0.0.0/24 dev enp0s3 proto kernel scope link src 10.0.0.1110.0.2.0/24 dev enp0s9 proto kernel scope link src 10.0.2.17 metric 10010.0.2.1 dev enp0s9 proto dhcp scope link src 10.0.2.17 metric 10010.10.10.0/24 dev enp0s8 proto kernel scope link src 10.10.10.11192.168.1.1 via 10.0.2.1 dev enp0s9 proto dhcp src 10.0.2.17 metric 100Most important line:
default via 10.0.2.1 dev enp0s9This means:
- ✔ Internet traffic goes out NAT (correct)
- ✔ Management network has NO gateway (correct)
- ✔ Provider network isolated (correct)
The extra line is just VirtualBox NAT internal routing. Ignore it.
192.168.1.1 via 10.0.2.1 -
Check DNS:
resolvectl statusThe output is coming from VirtualBox NAT DHCP. Perfectly fine.
Current DNS Server: 192.168.1.1DNS Servers: 192.168.1.1You can also run:
cat /etc/resolv.confOutput:
nameserver 127.0.0.53options edns0 trust-adsearch .That’s systemd-resolved stub. Normal for Ubuntu. DNS is working correctly.
If you got the same configurations, then that means:
- ✔ Correct 3-NIC separation
- ✔ Correct routing
- ✔ Correct DNS
- ✔ Static management & provider
- ✔ DHCP internet
- ✔ No conflicting gateways
Verify Connectivity
From any node, test:
# Ping other OpenStack nodes
ping -c3 10.0.0.11
ping -c3 10.0.0.21
ping -c3 10.0.0.31

# Ping the hostnames
ping -c 3 controller
ping -c 3 compute1
ping -c 3 block1

# Ping internet
ping -c3 8.8.8.8
ping openstack.org
Notes:
- All nodes should reach each other and the internet.
- SSH should work from host to all nodes
Install Basic Linux Utilities
Update and upgrade first:
sudo apt update
sudo apt upgrade -y
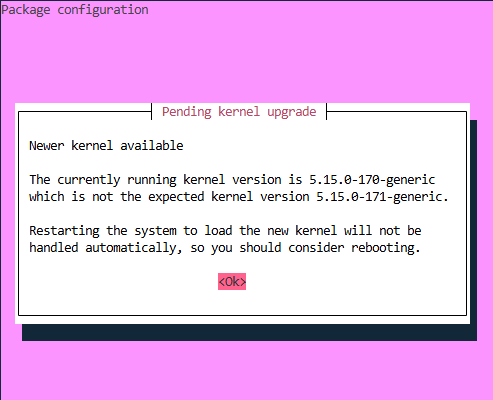
If prompted to load the new kernel, press Ok.
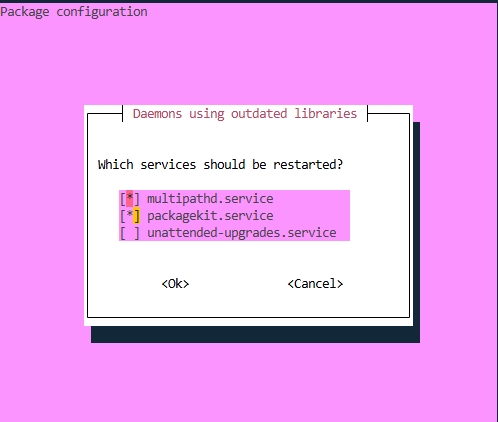
Leave the default. Press tab to select Ok and press Enter.
Next, install useful utilities:
sudo apt install -y vim htop glances curl wget net-tools
- vim: text editing
- htop/glances: system monitoring
- curl/wget: download files
- net-tools: legacy networking commands (
ifconfig, etc.)
Finally, reboot to apply kernel updates:
sudo reboot
Optional Firewall Configuration
Ubuntu minimal installs typically have the firewall disabled.
Check status:
sudo ufw status
If needed, enable firewall and allow OpenStack-related ports.
For lab setups, you can leave it disabled to avoid blocking inter-node communication.
Next Steps
Next, install the infrastructure services and Openstack repository packages.